Showing posts with label Tutorial. Show all posts

Monday, December 9, 2013

Weekly Picture How-To

I tend to fizzle out.  I'll start something strong, then eventually it goes by the wayside.  I think that's just human nature.  Self-discipline is not the most thrilling habit to exercise.  BUT I did stick to taking a picture of Silas every week of his first year of life, and I'm so happy I did!  Totally worth it.  Tuesday just became our picture day, and we made it a part of our routine.


I am not a professional photographer or photo editor by any stretch of the imagination, but here are a few tips I learned along the way.  Oh, by the way, I got this idea from the oh-so-famous Young House Love, so if you really want to see how it's done, you can hightail it over there!

First, try to keep as many things the same, as you can.  The location, the lighting, the angle, and the distance from your child can all be pretty uniform.  I tried to take the pictures by a big window with lots of indirect sunlight.  The time of day that we took the picture varied through the year, just depending on when we could get good light.  It ended up being somewhere in the mid to late afternoon, typically.  Don't forget to turn off that flash!

Silas wore a plain white onesie for every picture.  I just put him in whatever size he was currently wearing, however, I've seen pictures sequences where the same size (like a six month) onesie is used the entire time, so the kid can be seen growing into it.  Kind of a good idea.  I didn't think of it...  You could also put a stuffed animal or something in the picture to show how much your baby has grown.

Take lots of pictures!  The beauty of this digital age, is that you can take as many pictures as you want, and sift through them later.  If you finish, and look through your images only to find you don't have anything that will work, you aren't going to be thrilled to have to drag the fabric and baby back out to try again!  Better too many, than not enough.  When you're going through your pictures, try to find a different facial expression than last week.  Not every picture needs to be an angelic grin!


Be creative with your backgrounds!  I was fortunate to already have quite a bit of fabric on hand, but I also used a rug, a pillow case, one of my husband's dress shirts (I should have used more of his shirts when Silas was little and could fit on them!), a shower curtain, my Christmas tree skirt, a winter coat, several blankets, wrapping paper, sheets, and probably several other things I can't recall at the moment.  Start looking through your house...you'll be surprised how many things you come up with!  I also perused the clearance bins at JoAnn's, Hancock and Hobby Lobby for fabric remnants.  Those were always very cheap.  This can be a very low-cost endeavor if you just plan a little.

I didn't always do this successfully, but I liked to try to think ahead to any holidays that would be occurring that week, and tried to allude to it.  I would change the shape of the circle, or use a special background for those weeks.


Have fun with it!  I always tried to make it a highlight of the week.  If you're dreading another picture session, you probably won't get too many adorable expressions out of your little one.  Pump him up about it!  Play peek-a-boo with the camera, sing silly songs, make funny noises...you'd probably be worried about me if you could have seen me taking these pictures!  But the kid loved it.  Give him a few years, then he'll start worrying about me.

Okay.  Here are a few quick instructions for editing the pictures in Picmonkey.  Picmonkey.com is a free photo-editing website...you can pay for a subscription, but everything you really need is free.  I think by that statement, I've made it pretty clear, but if you're still wondering, no this isn't a sponsored post.  Picmonkey is very much not aware of my existence.  I just like pictures and I like free.  Boom.  Found my perfect match.

So, pull up the website, and click on "Edit a photo".


Follow the instructions to upload your photo.  You may want to take a second in the "Basic Edits" section to Auto Adjust your picture, or brighten it up a little bit under "Exposure".  

When you've got it like you like it, Open the "Overlays" page (click the butterfly on the left...why a butterfly??) and choose "Geometric".  Click on the Circle to add it to your picture.  This is where you would add a different image than a circle if you're wanting to do something special for a holiday or special event.  If picmonkey doesn't have the image you're looking for, you can try clicking on "Your Own" at the top of the menu.  You can download an image from the internet, then upload it to picmonkey with this option.

Now adjust the size of your circle, place it where you want it (try to make the circle approximately the same size every time), then using the "Overlay" pop-up tool bar, choose a color.  You can match your fabric, or choose a contrasting color.  When you get it about right, go ahead and "Fade" it a little...usually less than 20%, then under "Blend Modes", choose "Multiply".  This changes your circle's color a tad, so you may need to play with the color a little bit more at this point.  These last two steps make the circle look like it's more a part of the onesie instead of just a bright circle sitting on top.

Now it's time for the words.  Click on the "Text" page (the icon with the letters, "Tt"...makes a little more sense than the butterfly, I suppose).  Choose your desired font (I used "Quicksand"), and click "Add Text".
Here's where I added "43 Weeks", then you need to center it, change the color to white, then center it on your circle.  Of course, if your baby is tilted like Silas is in this picture, be sure to tilt your words, too!

Now just save, and you're done!


I know this is all super simple, but sometimes it helps to see a step-by-step tutorial.  If you have any questions or suggestions for others, please leave a comment below!


Saturday, August 10, 2013

Insta-Coasters...and a little living room update.

A few weeks ago we drove out to Ft. Riley Kansas to visit my bestie and her family.  There's a whole lotta not much between here and Kansas, y'all.  We're talking out in the sticks.  I mean, what was General Custer thinking...

We really had the best time.  Makes me want to move to Kansas for a few years just to keep hanging out with some of the coolest people we know.  Here we are looking appropriately festive for the 4th of July...


One day we headed two hours away (!) to the "big city" - Kansas City.  We tooled around and ended up at one sweet antique market kind of thing.  While we were digging through all the treasures, JP handed me a tile and said, "You'd like this."  He was correct!  So I got five more.  Actually six more (totaling seven) because the dear lady at the cash register couldn't count, and rather than try to get my money back (all whopping $1.50 of it) I just grabbed one more.

 Aren't they adorable?  And to think that pig would still be sitting in a bin in Kansas City if that woman had charged me the correct amount...  What a travesty that would have been.

Fasten your seatbelts.  Here comes a very detailed, step-by-step tutorial for making tiles into coasters.  I know.  You've been waiting your whole life for this.

Grab some sticky rubber things from your nearest home improvement store:


And stick them on.

Ya got all that?  If you need to scroll back up for a refresher, I understand.


I love them!  I think they have a lot more character than the ones I was using.  And whose coffee table couldn't stand a little more character?

 At that same shop, I found this tiny bust of Beethoven.  For seven big ones, how could I pass him up?  He is however, a bit more scary looking than I remember him being.  Just don't look directly into his eyes...


When I was taking this picture, I remembered I forgot to tell you about a little addition to our living room.  Meet our new buffet, a la Craigslist!


Staring at the back of our couch while coming in the door and up the stairs was getting pretty old.  I really love it!  I don't necessarily love that it looks like that bird is about to eat Beethoven's head, though...  A work in progress, I'd say.

Speaking of a work in progress, my son is screaming rather than taking a nap, so I'll quit rambling.  Go make something into a coaster!

Wednesday, May 1, 2013

Chalkboard Cabinets

You ain't nuthin' if you don't have a chalkboard.  At least that's certainly how it seems according to the world wide net web.  So, I started pondering how I could go about getting one.  Two problems: My kitchen (where I wanted the chalkboard) has almost zero wall space, and buying all the materials to make it was turning out to be kind of expensive!  I'm going to assume you already read the title, so it's not like you're racking your brain like I was, so I'll skip to the part where it hit me...of course!  My cabinet doors.  In a tiny kitchen, things need to double duty...pull your weight, cabinets!

So here's where we started.  Pretty standard set up.

 I grabbed a quart of Valspar chalkboard paint from Lowe's (which I'll admit was a bit more expensive than I thought necessary - $15!) but had everything else on hand.  Don't ask why I have teal painters tape.  It's nothing special...just the first roll I happened upon.  It may be for delicate surfaces?  Whatever.  It did the job.


I despise taping edges.  Which is why most of the edges of my house aren't perfect.  But I thought I could handle two cabinet backs.  So here one is in all of its taped glory.

Then I used my brush for the edges, and rolled the middle.  The first coat wasn't anything to write home about.


I waited an hour, then tried again.  Coat number two did the trick.


While the second coat was still wet, I took off the tape.  I then waited about twenty-four hours to let it cure.  Next up was conditioning it.  I just used the side of a piece of chalk and went over the surface really well.


And that's it!  I like to use chalk pens to write on them since it's so much easier...the only drawback is the chalk pen doesn't always come off with just a wet paper towel...you may have to scrub just a little bit with a magic eraser.  Worth it in my book.


Super easy and super quick....you should try it!  What other purpose are the backs of your cabinets serving?  You're going to love it, and in turn, love me.  Win-win.

Monday, March 11, 2013

Moby Wrap Knock-off


Here's the thing.  Everybody has things to do.  And most everybody has two arms with which to do those things.  The other thing is, that some people have babies.  A baby very often requires one, if not two, of those said arms.  Unless you want to quit doing all those things you have to do, a solution is required!  Fortunately, I'm not the first person to realize this problem.  There are baby carriers galore in this world.    One that I researched and rather liked, was the Moby Wrap.  So, in usual fashion, I decided to check Pinterest before actually buying something.  There were a few tutorials floating around, but really, there isn't much to explain.  Here's how it goes.

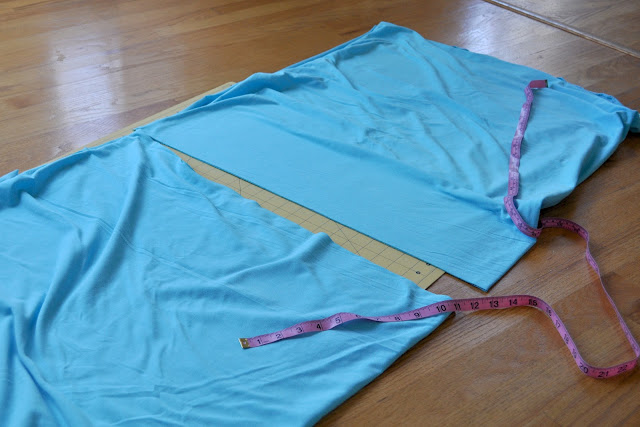
#1: Buy three yards of stretchy jersey knit fabric.  Make sure it stretches both ways.  It'll stretch one way more than the other, but it should at least give both ways.  Then spread it out.

#2: Fold it in half ...

...and in half again.

#3: Measure and cut it in half.  You're creating a skinnier piece of fabric that's twice as long - six yards.


 I really can't stress how imperfect this can be.  It's almost impossible to completely smooth out this fabric...so don't even try.

#4: Now take two of the short ends and sew them together.  I didn't pin and stress about the edges curling...I just made a good strong seam (I sewed over the original seam one or two more times).


 #5: Unless you are pure magic, you'll end up with something like this...

...so just take a pair of scissors and chop it off.  I'm telling you.  Imperfection is the key.


And that's it!  You should have a piece of fabric that's about six yards long and 25 - 30" wide.  It's a lot of fabric, my friend.


Now here's the humiliating part where I show you a video to demonstrate how to put it on.  It's pretty professional, so just hold on to your hats...


Moby Wrap 0-6 Mo. from Anna Johnson on Vimeo.

How 'bout that?  Hope it makes sense.  Hope none of you want to punch yourself in the face when you hear my voice, like I do.

So, if you've got a few minutes and can sew a straight(ish) line, you can save about forty big ones by making your Moby rather than buying it.  If you grab your fabric on sale, you should only spend about $10 on it. That's like a sweet, sweet melody to my penny pinching little heart.

Wednesday, February 27, 2013

Jumping on the Ombre Bandwagon

I bet if there really were some sort of wagon painted in a lovely ombre that people could jump on, they would.  That's how crazy the general public is about ombre.  People will ombre their cats in various shades of pink.  It's a sickness.

Regardless of these facts, I decided to join the party.  And while I was at it, I thought I'd take part in the ever-so-awesome Pinterest Challenge (put together by Young House Love and Katie Bower).  Let's make it official, shall we?


Consider it official.

I started out seeeveral months ago, with this.


The woman who sold it to me at a garage sale had the gall to haggle with me, telling me it was her Grandfather's desk, and practically a priceless antique.  Sigh.  If it's that near and dear to your heart, lady, don't paint it eight colors, spill wax all over it, slap no less than twelve drawer pulls on it, then drag it onto your front lawn to be sold to the highest bidder!  Take my money, woman!

Here's a nice sampling of a few of the colors this beauty has been over the years.


Poor Grandpa.  If he could only see his beloved desk now.  I'm sure wherever he is, he was happy that I took it that fine Saturday.

Then it sat in my garage for quite the while.  One fine day I finally heave-hoed it out into my driveway and started in on it.

If I was patient and long suffering and a true lover of furniture, I'm sure I would have stripped all the paint off and lovingly refinished it.  That is not what happened.

I did, however, sand down and unearth the piece of hardware on the front rather than painting over it yet again.

 Looky there.  A bit bedraggled, but paint free!

I also took the liberty of removing all of the drawer hardware.  They looked like peanutbutter balls in my estimation.  Maybe I should have left them...  Now I'm hungry.


I filled the massive amounts of holes in the drawers with a little spackle...just squished it in there good with my finger and scraped off the excess with a putty knife.

Once it was dry, I sanded it a tiny bit to smooth it out, then started painting!  Pretty simple, really.  I just used a 3" roller and bright white paint.  Just slapped it right on over the other thirteen coats.  Wasn't perfect, but it did the job.


Then I didn't like it.  Part of it was the over abundance of white, and the other part was it was kinda gloppy in places.  Like where the fold-down desk meets the desk frame.


Also, the hinges were ridiculous.  They could barely move.  Soooo, I scraped and scraped until I finally reached the screws to remove the hinges.  That was a good time.


Then, I got myself down to Home Depot and snagged three test pots of paint and had them colored three shades of blue.  I couldn't tell you the names if I had to.  Just picked three off a gradient paint chip.


I put two quick coats on the fronts of the drawers and let them dry over night.  I just sanded down and touched up a couple spots on the front of the desk, and lightly spray painted the hinges.  Then Anthony put it all back together since I'm lazy like that.

Oh, and to spruce up the inside of the desk, I took a piece of cardboard, some cork contact "paper" I happened to have on hand, and a piece of fabric...


I cut the cork to the same size as the cardboard and just stuck it right on.


Then I whipped out my trusty glue gun and wrapped it all up in the fabric.

There you have it!  Instant spruce!

And here's the final product.  Finally.


Hope we made Grandpa proud.