Friday, March 29, 2013

27 Weeks


A banner week - finally moved this kid to a six month onesie (he's thankful for room to breath) and to size 3 diapers.  Should have done that four pounds ago.  Now everything stays inside the diaper like it's supposed to.  Amazing how that works.

In other news, he went on his first camping trip and tried out his first solid food (which he hated) this week.  The kid's going to be grown and gone before we know it. 

Pretty much every single picture I took was of him blowing raspberries this week.  He was pretty excited about life.  


Tuesday, March 19, 2013

26 Weeks


Silas hit the six month mark this past week!  So hard to believe...  Then again, I've yet to hear a parent say "This infancy is just crawling by!  Why is my baby so tiny and adorable still?".  So I guess it shouldn't really be that hard to believe.  Thankfully he's staying adorable, just not so little any more.  At his six month check up, he was 27 1/4" (80th percentile) and 19 pounds, 12 ounces (85th percentile)!  Phew.  No wonder my back hurts all the time...

Another big and exciting adventure of this past week, is he started sitting up on his own (for very short periods of time)!  He's getting better at it every day.  Crazy kid.


Tuesday, March 12, 2013

25 Weeks


This past week Si has started "talking" so much more!  He says "la, la, la" and "da, da, da", and my favorite, "dla, dla, dla".  Pretty intelligent, that kid of ours.  His "fabric" this week is his blanket that he uses every time he sleeps.  It goes with us just about everywhere!


Oh, that kid.

Monday, March 11, 2013

Moby Wrap Knock-off


Here's the thing.  Everybody has things to do.  And most everybody has two arms with which to do those things.  The other thing is, that some people have babies.  A baby very often requires one, if not two, of those said arms.  Unless you want to quit doing all those things you have to do, a solution is required!  Fortunately, I'm not the first person to realize this problem.  There are baby carriers galore in this world.    One that I researched and rather liked, was the Moby Wrap.  So, in usual fashion, I decided to check Pinterest before actually buying something.  There were a few tutorials floating around, but really, there isn't much to explain.  Here's how it goes.

#1: Buy three yards of stretchy jersey knit fabric.  Make sure it stretches both ways.  It'll stretch one way more than the other, but it should at least give both ways.  Then spread it out.

#2: Fold it in half ...

...and in half again.

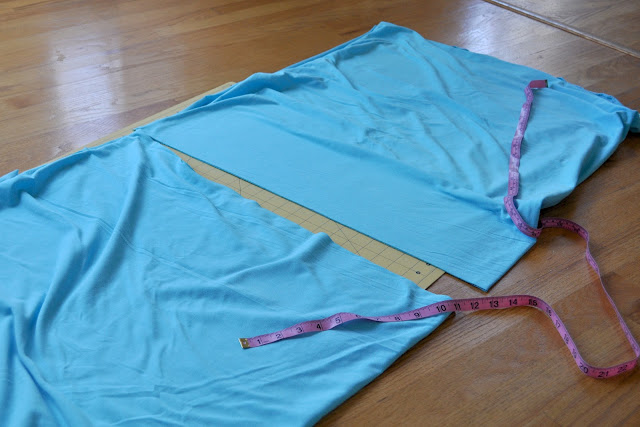
#3: Measure and cut it in half.  You're creating a skinnier piece of fabric that's twice as long - six yards.


 I really can't stress how imperfect this can be.  It's almost impossible to completely smooth out this fabric...so don't even try.

#4: Now take two of the short ends and sew them together.  I didn't pin and stress about the edges curling...I just made a good strong seam (I sewed over the original seam one or two more times).


 #5: Unless you are pure magic, you'll end up with something like this...

...so just take a pair of scissors and chop it off.  I'm telling you.  Imperfection is the key.


And that's it!  You should have a piece of fabric that's about six yards long and 25 - 30" wide.  It's a lot of fabric, my friend.


Now here's the humiliating part where I show you a video to demonstrate how to put it on.  It's pretty professional, so just hold on to your hats...


Moby Wrap 0-6 Mo. from Anna Johnson on Vimeo.

How 'bout that?  Hope it makes sense.  Hope none of you want to punch yourself in the face when you hear my voice, like I do.

So, if you've got a few minutes and can sew a straight(ish) line, you can save about forty big ones by making your Moby rather than buying it.  If you grab your fabric on sale, you should only spend about $10 on it. That's like a sweet, sweet melody to my penny pinching little heart.

Thursday, March 7, 2013

Fresh Honey & Lemon Fruit Salad

This isn't much of a recipe, but the glaze is pretty great, so I thought I'd share.

Obviously, you can use whatever fruit floats your boat, but pineapple, strawberries, grapes and blueberries are our favorites.

Fresh pineapple is totally worth a few extra minutes to cut up.  Here's my (probably incorrect) method of getting to the goodness:


Lop off the head.


Then shave off the sides.

 Then cut it into about 1/2" slices.

 Then just cut around the core


 And cut the rest up into whatever sized chunks you like.  Easy peasy.

Next, throw in the blueberries.

Then cut the strawberries into quarters and add them to the mix.


And finally, toss in the grapes. Mmmmmm.

 Now for the glaze.  You can change up the proportions depending on your taste, but I use twice as much honey as lemon.  For this fruit salad, it was about two tablespoons of honey and one tablespoon of lemon.  I use raw, organic, local honey (because I'm super cool like that), and lemon juice that isn't from concentrate (it's usually hanging out in the produce section).  I really feel like they both taste a lot better than their not-so-fancy sounding counterparts.  Maybe it's all in my head.


Stir the honey and lemon together until completely combined, then pour over your fruit and gently mix it all together.

 I usually sprinkle some poppy seeds on top just because I can.


So there you have it.  Extremely simple, but extremely tasty.  Also, as an added bonus, the lemon juice will help everything stay fresh for a few days, soooo...win-win.  Hope you enjoy!