You may be wondering why I need said felt-art. Well, I'll tell you. I have a most understanding husband. But there are times when I know when to ask him to move a shelf that took him eight years to hang, and when to find something to throw on the wall to make the shelf not look so high. Have a look at our bedroom.
Now let's all just take a moment to admit it. That's a high shelf.
But it's exactly where I told him to put it, so...on to making a space filler!
First, cut a square. I made mine 6" x 6".
Now, trace an X on your felt.
Now, cut along the lines toward the center, but leave the very center uncut.
Next, you need to whip out your trusty fabric glue. Any kind will probably do, but I use Fabri-Fix from Hobby Lobby.
Put a dot on every other corner, and fold that corner in to the center.
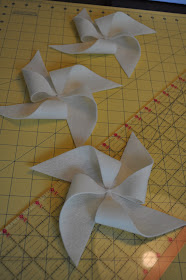
And about five minutes later, you've got yourself a few pinwheels!
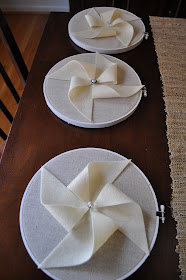
Oh, and I got some buttons and sewed them on the middle of the pinwheels to cover that little messy part.
For this next step, I was planning on finding some frames to mount the pinwheels on, but because I'm so cheeeeap (refer to paragraph #1), I decided to use embroidery hoops. Again. But this time I painted them white, so I feel like they're totally different than the hoops in my living room. I skipped taking a picture of the spray painting step, because...I just spray painted them.
I got a little bit of muslin fabric from my friend, JoAnn (I was going to get burlap, but she was out...) and threw it in the hoops.
Glop a little more glue on the back of the pinwheel, and stick it right on.
And repeat!
Then I...put 'em on the wall!
I suppose they'll work until I get all that international, multi-million dollar art up...


I love it. It's beautiful. I might have to use your idea for something similar :-)
ReplyDeleteI really cannot get over these! I will have some in my house someday :)
ReplyDeleteSuper cuteness, as usual. . .
ReplyDeleteYou are SO creative! I love your style :)
ReplyDelete